Unifi controller on GCP (Part 2) (ddclient)
I started off writing a very simple guide on how to spin up a Unifi controller on GCP
One of the things I mentioned is that I don’t assign static IP’s. Not because I you don’t need one, but more because I prefer to stick to using DNS as a means of connecting services. Hard coding static IP’s is almost never a good idea. Anyone who has ever performed some type of system migration can tell you that.
As I have moved my controller around between various public clouds, I like the flexibility of essentially using DNS to figure out where my controller is. To do this, I use ddclient
Before we get started, you will need a dynamic IP service. There are loads of free services available, though their numbers are diminishing every year. As previously mentioned I use Cloudflare for quite a few things, and as they provide an API that I will make use of its service for this demonstration.
Requirements:
- Ubuntu 16.04
- A Unifi Controller on GCP
- SSH access to your instance
- sudo permissions
BIG FAT WARNING!!!
Make sure you read this entire section before starting. There is a rather annoying bug with the version of ddclient that ships with Ubuntu 16.04. I can 100% confirm this is still a bug at the time of writing. It apparently also impacts instances running in Azure. Simply installing ddclient using apt will ship the buggy version, it also does not support the new Cloudflare API’s. As is noted on launchpad you can “brick” an instance by following this simple guide:
Steps to reproduce **DO NOT DO THIS!!!!**:
1. Create a new network (not a legacy network) with default ports (22 for SSH etc).
2. Create a new Ubuntu instance using a 1604 image from GCE.
3. SSH into the instance and install ddclient. Set the config file with any contents.
4. Restart the instance.
5. Try to SSH to the instance or look at the serial console output to see the errors.
So instead of using apt to install ddclient, we will pull the more recent version/fork from github and follow their install instructions. Here is how to do that:
- Jump on your instance and run the following commands in order:
apt-get clean
apt-get update
apt-get install libdata-validate-ip-perl libio-socket-ssl-perl git wget -y
git clone https://github.com/ddclient/ddclient.git
cd ddclient
cp ddclient /usr/sbin/
mkdir /etc/ddclient
mkdir /var/cache/ddclient
cp sample-etc_rc.d_init.d_ddclient.ubuntu /etc/init.d/ddclient
update-rc.d ddclient defaults
- Now lets setup the configuration file (again this is for Cloudflare). To do this simply create a file called “ddclient.conf” in /etc/ddclient.
Mine looks like this:
sudo cat /etc/ddclient/ddclient.conf
daemon=120
use=web
ssl=yes
protocol=cloudflare,                           \
login=<my cloudflare login email>                          \
password=<my cloudflare API key>             \
zone=domain1.com,controller.domain1.com
So if your controllers DNS name is going to be “controller.seamoo.se” you would put “seamoo.se,controller.seamoo.se”. Feel free to play around with the variables, but what you see above is the bare minimum you will need to get ddclient working with Cloudflare. Setting the daemon to 120 seconds is a bit extreme, but if you’re constantly stopping/starting your controller instance perhaps it isn’t.
Once you’ve populated your config file, you should be free to start up ddclient. Before you do, its worth running it in debug mode to make sure all is well. Simply run this:
ddclient -daemon=0 -debug -verbose -noquiet
If you’ve followed this article exactly, you may find you get an error message similar to this:
FAILED: updating controller.seamoo.se: No DNS record ID found.
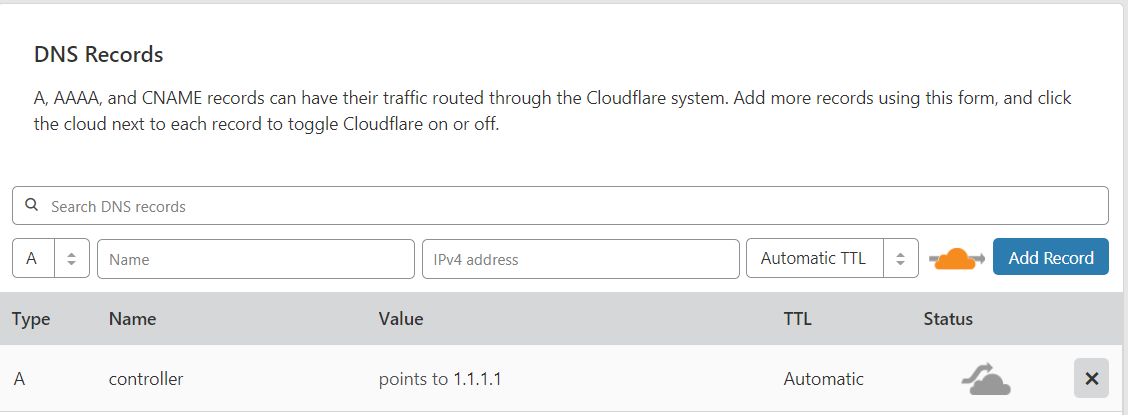
One “gotcha” I noticed with Cloudflare is that the DNS record needs to exist first in order for this to work, other dyanmic DNS services may do the same, so perhaps create the record first and point it to any IP, ideally one that isn’t your controller so you can be sure it updates automatically. In addition to that, make sure the connection is NOT proxied through Cloudflare (ie grey cloud, not orange), otherwise your Unifi devices won’t be able to communicate with the controller.
Once you’ve created the record in Cloudflare, you can re-run ddclient in debug mode and you should see something like this at the end:
SUCCESS: controller.seamoo.se -- Updated Successfully to 35.189.63.97
If however you’ve run the command within the allocated time period (ie 120 seconds) you may get this at the bottom:
SUCCESS: controller.seamoo.se: skipped: IP address was already set to 35.189.63.97.
That is because the file /var/cache/ddclient/ddclient.cache is already populated with the IP record. To resolve this, simply remove this file and re-run ddclient -daemon=0 -debug -verbose -noquiet
So before I started ddclient my record looked like this:
Then I started ddclient with:
sudo systemctl start ddclient
And then in the Cloudflare dashboard after refreshing:
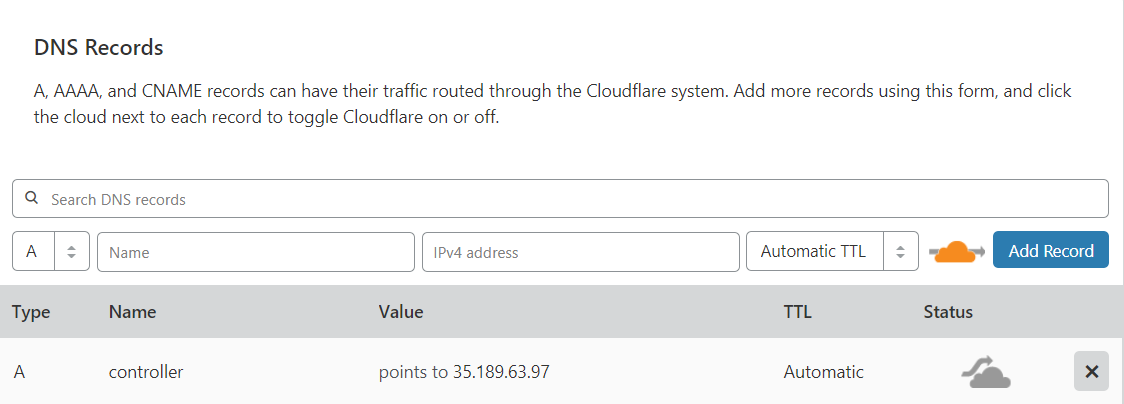
PRESTO!
Now that you’re done setting up ddclient on your unifi controller, you can set all of your devices to inform with the url http://<your dns name>:8080/inform
So simply typing something like this in your unifi devices should work:
set-inform http://controller.seamoo.se:8080/inform
If your controller ever changes its IP, you wont have to update each of your devices manually.