Simplifying Argo Tunnels (Part 2)
Before you get started using named tunnels, its important to you make sure cloudflared is up to date.
You can do this by simply issuing cloudflared update on the cli, or grabbing the latest release . I am going to make the assumption that this is the first time you’ve setup a tunnel so will start at the beginning.
1: Login to Cloudflare:
root@dns2:~# cloudflared login
Please open the following URL and log in with your Cloudflare account:

https://dash.cloudflare.com/argotunnel?callback=https%3A%2F%2Flogin.argotunnel.com*<random string here>*

Leave cloudflared running to download the cert automatically.
Navigate to the dash.cloudflare.com URL in your browser and select the domain you want to tie this instance of cloudflared to and then simply select Authorize.
You should then see a message like the following in your terminal:
You have successfully logged in.
If you wish to copy your credentials to a server, they have been saved to:
/root/.cloudflared/cert.pem
2: Move the cert file to /etc/cloudflared/
mv .cloudflared/cert.pem /etc/cloudflared/
3: Create a named tunnel:
root@dns2:~# cloudflared tunnel create services
INFO[2020-12-14T15:58:52+11:00] Tunnel credentials written to /etc/cloudflared/<YOUR CREDENTIALS FILE>.json. cloudflared chose this file based on where your origin certificate was found. Keep this file secret. To revoke these credentials, delete the tunnel.
INFO[2020-12-14T15:58:52+11:00] Created tunnel services with id <YOUR CREDENTIALS FILE>
root@dns2:~#
4: Configure the tunnel in your main config file:
root@dns1:~# cat /etc/cloudflared/config.yml
tunnel: services
credentials-file: /etc/cloudflared/<YOUR CREDENTIALS FILE>.json

ingress:
 # pi1.seamoo.se
 - hostname: pi1.seamoo.se
   service: http://192.168.1.1
 # pi2.seamoo.se
 - hostname: pi2.seamoo.se
   service: http://192.168.1.2
 # Catch-all rule doesn’t actually use any of the config
 - service: http_status:404

root@dns1:~#
So lets take a moment here to look at what is actually happening.
- The first thing we do is create a tunnel named “services”. Its name is not actually bound to any specific domain name, it is simply a name.
- When the named tunnel “services” is created it binds to the cert.pem file found in /etc/cloudflared/. If the file was located elsewhere (such as /root/.cloudflared/cert.pem, or /usr/local/etc/cloudflared/) it would bind to that location. If you move the location of the cert file, keep that in mind as the credentials file (the json one) will need to be updated as well).
- The format is a little different to what you may have used previously.
- Finally, within the configuration file we have multiple inbound DNS services configured. They are “pi1.seamoo.se” and “pi2.seamoo.se”. Its important to remember that this type of configuration does not automatically create the appropriate DNS entries on the Cloudflare dashboard. (will cover that shortly).
5: Finally, install the service and start it:
cloudflared service install
systemctl enable cloudflared
systemctl start cloudflared
If you’ve reached this point, you can now check to see if the tunnels are up and running:
root@dns2:~# cloudflared tunnel list
ID                                   NAME     CREATED              CONNECTIONS
00000000-0000-0000-0000-000000000000 XXXX     2020-12-08T03:42:02Z 2xMEL, 2xSYD
00000000-0000-0000-0000-000000000000 XXX      2020-12-09T00:43:28Z 2xMEL, 2xSYD
00000000-0000-0000-0000-000000000000 services 2020-12-14T05:31:36Z 2xMEL, 2xSYD
root@dns2:~#
So we can see the “services” tunnel is now connected. Its time to point our URL’s to this service. To do this, you simply navigate to the DNS tab in the Cloudflare dashboard and create a CNAME record pointing to
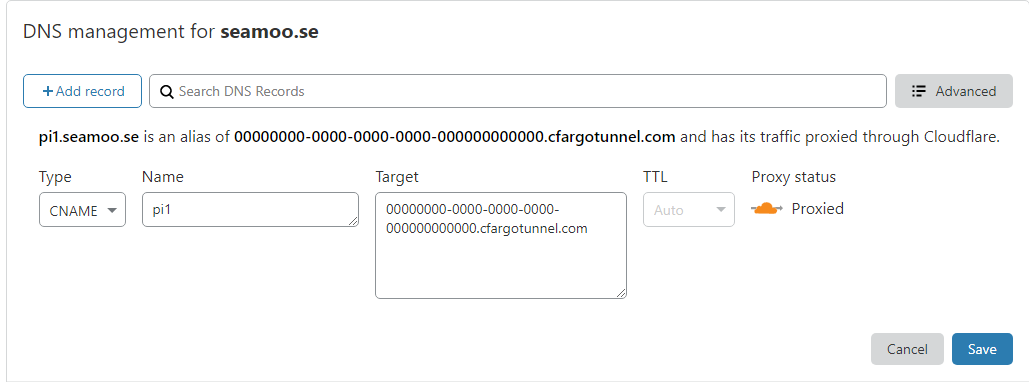
All that is left to do is browse to your endpoint (in the example above, pi1.seamoo.se) and away you go!